
HMRouter 简介
HMRouter 作为 HarmonyOS 的页面跳转场景解决方案,聚焦解决应用内原生页面的跳转逻辑。
HMRouter 底层对系统 Navigation 进行封装,封装了 Navigation、NavDestination、NavPathStack 的能力,提供了可复用的路由拦截、自定义转场动画、页面生命周期框架,目的是让开发者在开发中无需关注 Navigation、NavDestination 容器组件的相关细节及模板代码,更好的进行模块间解耦。
特性
基于注解声明路由信息
支持 Har、Hsp、Hap
支持 Navigation 路由栈嵌套
支持路由拦截器(包含全局拦截、单页面拦截、跳转时一次性拦截)
支持生命周期回调(包含全局生命周期、单页面生命周期、跳转时一次性生命周期)
内置转场动画(页面、Dialog),可配置方向、透明度、缩放,支持跟手抽屉式转场动画,同时支持配置某个页面的转场动画、跳转时的一次性动画
支持 Dialog 类型页面、支持单例页面
依赖版本
HarmonyOS NEXT Beta3 及以上
使用方法
1. 打开允许权限
# 在模块的module.json5文件中配置网络权限

{
  "module":{
    "requestPermissions": [
      {
        "name": "ohos.permission.INTERNET"
      }
    ],
  }
}2. 安装依赖
ohpm install @hadss/hmrouter3. 使用配置
- (1) 修改项目的 hvigor/hvigor-config.json 文件,加入路由编译插件(根目录)
{
  "dependencies": {
    "@hadss/hmrouter-plugin": "^1.0.0-rc.3" // 你自己的版本号必须和oh-package.json5的版本号一致
  },
  // ...其他配置
}- (2) 在模块中引入路由编译插件,修改
hvigorfile.ts
这里的文件是在模块下面 就是 Entry 下面的hvigorfile.ts
而不是根目录下的hvigorfile.ts
import { hapTasks } from "@ohos/hvigor-ohos-plugin";
import { hapPlugin } from "@hadss/hmrouter-plugin";

export default {
  system: hapTasks,
  plugins: [hapPlugin()],
};INFO
如果是 Har 则使用 harPlugin(), Hsp 则使用 hspPlugin()
初始化
- (1) 在模块的
entry/src/main/ets>entryability>entryAbility.ets中初始化 HMRouter
import { HMRouterMgr } from "@hadss/hmrouter";

// 初始化 HMRouter
  onCreate(want: Want, launchParam: AbilityConstant.LaunchParam): void {
    hilog.info(0x0000, 'testTag', '%{public}s', 'Ability onCreate');
    HMRouterMgr.init({
      context: this.context
    })
}- (2) 工程目录下的 build-profile.json5 中,配置 useNormalizedOHMUrl 属性为 true
{
  "app": {
    "products": [
      {
        "name": "default",
        "signingConfig": "default",
        "compatibleSdkVersion": "5.0.0(12)",
        "runtimeOS": "HarmonyOS",
        "buildOption": {
          "strictMode": {
            "useNormalizedOHMUrl": true
          }
        }
      }
    ],
    // ...其他配置
  }
}初级使用
使用的时候只能在虚拟机上运行,不能在预览器运行
(1) 创建三个页面
Index.ets (路由入口页面)
Index2.ets (跳转页面)
Index3.ets (跳转页面)
(2) Index.ets 路由入口页面
import { HMDefaultGlobalAnimator, HMNavigation, HMRouterMgr } from '@hadss/hmrouter';
import { AttributeUpdater } from '@kit.ArkUI';

@Entry
@Component
struct Index {
  @State message: string = 'Hello World';
  modifier: AppNavModifier = new AppNavModifier();

  build() {
    Column() {
      // 使用HMNavigation容器
      HMNavigation({
        navigationId: 'AppNavigation', options: {
          standardAnimator: HMDefaultGlobalAnimator.STANDARD_ANIMATOR,
          dialogAnimator: HMDefaultGlobalAnimator.DIALOG_ANIMATOR,
          modifier: this.modifier
        }
      }){
        Button("点击跳转到2").fontSize(62).onClick(()=>{
          HMRouterMgr.push({
            pageUrl:'Index2'
          })
        })
      }
    }
    .height('100%')
    .width('100%')
  }
}

class AppNavModifier extends AttributeUpdater<NavigationAttribute> {
  initializeModifier(instance: NavigationAttribute): void {
    instance.mode(NavigationMode.Stack);
    instance.navBarWidth('100%');
    instance.hideTitleBar(true);
    instance.hideToolBar(true);
  }
}(3) Index2.ets 跳转页面(页面必须导出否则报错)
import { HMRouter, HMRouterMgr } from '@hadss/hmrouter';
// 必须导出 必须里面写pageUrl
@HMRouter({pageUrl:'Index2'})
@Entry
@Component
export struct Index2 {
  build() {
    Column(){
      Button("点击2").type(ButtonType.Capsule).onClick(()=>{
         HMRouterMgr.push({
           navigationId:'AppNavigation',
           pageUrl:'Index3'
         })
      })
    }
  }
}(4) Index3.ets 跳转页面(页面必须导出否则报错)
import { HMRouter, HMRouterMgr } from '@hadss/hmrouter'

@HMRouter({pageUrl:'Index3'})
@Entry
@Component
 export struct Index3 {
  build() {
    Column(){
      Button("点击3").type(ButtonType.Capsule).onClick(()=>{
        console.log("点击了我3")
        HMRouterMgr.push({
          navigationId:'AppNavigation',
          pageUrl:'Index2'
        })
      })
    }
  }
}跳转
push
- 压入栈,如果栈中存在则不压入
HMRouterMgr.push(
  {
    navigationId: "AppNavigation", // 操作页面栈(你自己的ID),当navigationId为空时,表示对最近一次操作的navigation进行路由跳转
    pageUrl: "Index2", // 需要跳转的目标页面,push/replace操作必填参数
    param: {
      data: { name: "第一个页面过来的数据", id: 1 },
    }, //跳转页面携带参数,push/replace表示传递给下个页面的参数,pop表示回传给上一个页面的返回参数
    interceptors: [], // IHMInterceptor[] 自定义拦截器,最高优先级执行
    animator: false, // IHMAnimator | boolean 自定义动画,使用传入的动画进行专场,不再使用原先定义的转场动画,传入false时将禁用动画
    skipAllInterceptor: false, //  // 是否跳过所有拦截器执行,不能跳过传入的interceptors拦截器
  },
  {
    // 页面返回回调,最好用箭头函数因为要改变外面的状态值
    onResult: (popInfo: HMPopInfo) => {
      console.log(JSON.stringify(popInfo));
    },
    // // 目标页面跳转完成回调
    onArrival: () => {
      console.log("页面跳转过去了,已经完成了");
    },
    // 目标页面找不到回调
    onLost: () => {
      console.log("没有这个页面啊");
    },
  }
);- 接收参数
this.param = HMRouterMgr.getCurrentParam();
Text(this.param).fontSize(62);replace
参数同 push 只不过他是替换栈顶的页面
pop(不一样)
如需使用页面返回功能,在对应的业务逻辑位置使用 HMRouterMgr 提供的 pop 方法实现页面返回,同样的 pop 方法支持传入 navigationId,同时 HMRouter 还支持在返回时通过配置 param 参数向其所返回的页面传递参数。
他接收两个参数一个就是返回页面的信息
另外那个是层级(本人测试没有效果)
//  @param pathInfo
//  @param skipedLayerNumber 页面返回的层级数量,默认为0,表示返回上一级,1表示跳过一级页面返回,
//  即同时两个页面出栈,pathInfo.pathInfo参数优先级高于skipedLayerNumber
HMRouterMgr.pop({
  navigationId: "mainNavigationId",
  pageUrl: "HomePage",
  param: this.param,
});- pop 接收参数 一定要写到 onResult 回调函数里面 它里面在改变状态
 Button("点击2").type(ButtonType.Capsule).onClick(() => {
    console.debug("测试路由", JSON.stringify(this))
    HMRouterMgr.push({
      navigationId: 'AppNavigation',
      pageUrl: 'Index3'
    }, {
      // 页面返回回调
      onResult: (popInfo: HMPopInfo) => {
        console.debug("测试路由", JSON.stringify(this))
        console.debug("测试路由", JSON.stringify(popInfo.result))
        this.routerId = (popInfo.result as ParamsType).id;
        console.debug("测试路由", this.routerId)
        if (this.routerId == 4) {
          console.debug("测试路由", "this.routerId确实等于3")
          console.debug("测试路由结果", JSON.stringify(this))
          this.flag = true;
          this.name = (popInfo.result as ParamsType).name;
        }
      },
      // // 目标页面跳转完成回调
      onArrival() {
        console.log("页面跳转过去了,已经完成了")
      },
      // 目标页面找不到回调
      onLost() {
        console.log("没有这个页面啊")
      }
    })
})- 多次页面跳转返回指定页面
当页面跳转路径如 HomePage->PageA->PageB->PageC,开发者希望在 PageC 的页面逻辑中直接返回到 HomePage 并携带参数,开发者仅需使用 HMRouterMgr 提供的 pop 方法,传入要返回目标页面的 pageUrl、传递的参数 param,即可直接带参返回到指定页面。
HMRouterMgr.pop({
  navigationId: "mainNavigationId",
  pageUrl: "HomePage",
  param: this.param,
});
生命周期
(1) 创建生命周期钩子函数
在 entry>src>main>etc 下面新建一个 Lifecycle 文件夹,在 Lifecycle 文件夹下面新建一个 Lifecycle.ets 文件,Lifecycle.ets 文件内容如下:
import { HMLifecycle, HMLifecycleContext, IHMLifecycle } from "@hadss/hmrouter";

@HMLifecycle({ lifecycleName: "RouterLife" })
export class RouterLife implements IHMLifecycle {
  onPrepare(ctx: HMLifecycleContext): void {
    console.debug("测试路由生命周期", "RouterLife", "onPrepare");
    console.debug(
      "测试路由生命周期",
      "RouterLife",
      "onPrepare",
      JSON.stringify(ctx)
    );
  }

  onAppear(ctx: HMLifecycleContext): void {
    console.debug("测试路由生命周期", "RouterLife", "onAppear");
    console.debug(
      "测试路由生命周期",
      "RouterLife",
      "onAppear",
      JSON.stringify(ctx)
    );
  }

  onDisAppear(ctx: HMLifecycleContext): void {
    console.debug("测试路由生命周期", "RouterLife", "onDisAppear");
    console.debug(
      "测试路由生命周期",
      "RouterLife",
      "onDisAppear",
      JSON.stringify(ctx)
    );
  }

  onShown(ctx: HMLifecycleContext): void {
    console.debug("测试路由生命周期", "RouterLife", "onShown");
    console.debug(
      "测试路由生命周期",
      "RouterLife",
      "onShown",
      JSON.stringify(ctx)
    );
  }

  onHidden(ctx: HMLifecycleContext): void {
    console.debug("测试路由生命周期", "RouterLife", "onHidden");
    console.debug(
      "测试路由生命周期",
      "RouterLife",
      "onHidden",
      JSON.stringify(ctx)
    );
  }

  onWillAppear(ctx: HMLifecycleContext): void {
    console.debug("测试路由生命周期", "RouterLife", "onWillAppear");
    console.debug(
      "测试路由生命周期",
      "RouterLife",
      "onWillAppear",
      JSON.stringify(ctx)
    );
  }

  onWillDisappear(ctx: HMLifecycleContext): void {
    console.debug("测试路由生命周期", "RouterLife", "onWillDisappear");
    console.debug(
      "测试路由生命周期",
      "RouterLife",
      "onWillDisappear",
      JSON.stringify(ctx)
    );
  }

  onWillShow(ctx: HMLifecycleContext): void {
    console.debug("测试路由生命周期", "RouterLife", "onWillShow");
    console.debug(
      "测试路由生命周期",
      "RouterLife",
      "onWillShow",
      JSON.stringify(ctx)
    );
  }

  onWillHide(ctx: HMLifecycleContext): void {
    console.debug("测试路由生命周期", "RouterLife", "onWillHide");
    console.debug(
      "测试路由生命周期",
      "RouterLife",
      "onWillHide",
      JSON.stringify(ctx)
    );
  }

  onReady(ctx: HMLifecycleContext): void {
    console.debug("测试路由生命周期", "RouterLife", "onReady");
    console.debug(
      "测试路由生命周期",
      "RouterLife",
      "onReady",
      JSON.stringify(ctx)
    );
  }

  onBackPressed(ctx: HMLifecycleContext): boolean {
    console.debug("测试路由生命周期", "RouterLife", "onBackPressed");
    console.debug(
      "测试路由生命周期",
      "RouterLife",
      "onBackPressed",
      JSON.stringify(ctx)
    );
    return false;
  }
}(2) 页面上使用生命周期函数
- 在需要的页面中引入生命周期
我这里拿一个基础页面举例子,要在 HMrouter 里面加入 lifecycle,名字就是你定义的生命周期类名
import { HMLifecycle, HMPopInfo, HMRouter, HMRouterMgr } from '@hadss/hmrouter';


// 必须导出 必须里面写pageUrl
@HMRouter({ pageUrl: 'Index2', lifecycle: 'RouterLife' })
@Entry
@Component
export struct Index2 {
  @State routerId: number = 0;
  @State flag: boolean = false;
  @State name: string = ""

  build() {
    Column() {
      if (this.flag) {
        Text("收到了返回值").fontSize(67)
        Text(this.name).fontSize(72)
      }
      Button("点击2").type(ButtonType.Capsule).onClick(() => {
        console.debug("测试路由", JSON.stringify(this))
        HMRouterMgr.push({
          navigationId: 'AppNavigation',
          pageUrl: 'Index3'
        }, {
          // 页面返回回调
          onResult: (popInfo: HMPopInfo) => {
            console.debug("测试路由", JSON.stringify(this))
            console.debug("测试路由", JSON.stringify(popInfo.result))
            this.routerId = (popInfo.result as ParamsType).id;
            console.debug("测试路由", this.routerId)
            if (this.routerId == 4) {
              console.debug("测试路由", "this.routerId确实等于3")
              console.debug("测试路由结果", JSON.stringify(this))
              this.flag = true;
              this.name = (popInfo.result as ParamsType).name;
            }
          },
          // // 目标页面跳转完成回调
          onArrival() {
            console.log("页面跳转过去了,已经完成了")
          },
          // 目标页面找不到回调
          onLost() {
            console.log("没有这个页面啊")
          }
        })
      })
    }
  }
}

interface ParamsType {
  id: number,
  name: string,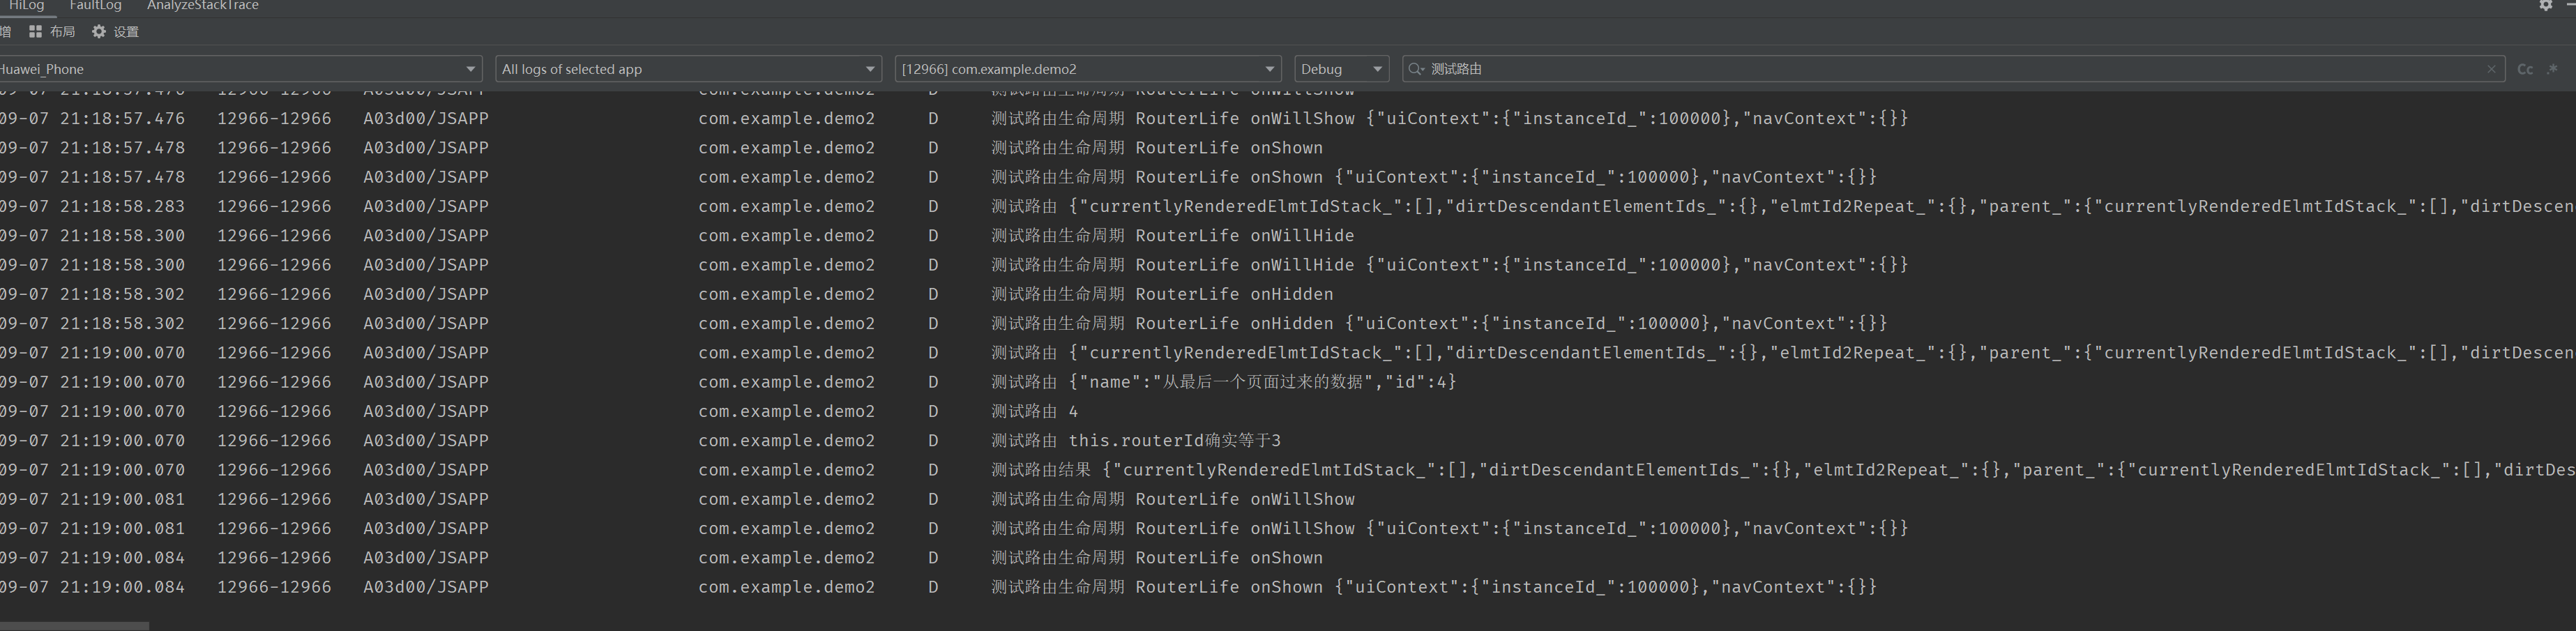
}(3) 结果
拦截器
创建拦截器
- (1) 在 entry>src>main>stc>model(你自己起的一个文件夹)新建 Interceptor.ets 文件
INFO
HMInterceptor 是拦截器装饰器 里面有三个参数
- nterceptorName: string, 拦截器名称,必填
- priority: number, 拦截器优先级,数字越大优先级越高,非必填,默认为 9;
- global: boolean, 是否为全局拦截器,当配置为 true 时,所有跳转均过此拦截器;默认为 false,当为 false 时需要配置在@HMRouter 的 interceptors 中才生效。
我在下面创建了 2 个拦截器 它优先执行 priority 为 9 的,在执行 priority 为 7 的
import { HMInterceptor, HMInterceptorAction, HMInterceptorInfo, HMRouterMgr, IHMInterceptor } from '@hadss/hmrouter';

@HMInterceptor({priority:9,interceptorName:'LoginInterceptor'})

export class LoginInterceptor implements IHMInterceptor {
  private isLogin: boolean = true;

  handle(info: HMInterceptorInfo): HMInterceptorAction {
    if (this.isLogin) {
      // 跳转下一个拦截器处理
      console.debug("测试拦截",'拦截器1','拦截住了');
      return HMInterceptorAction.DO_NEXT;
    } else {
      HMRouterMgr.push({
        pageUrl: 'Index4',
        param: { targetUrl: info.targetName },
        skipAllInterceptor: true
      })
      // 拦截结束,不再执行下一个拦截器,不再执行相关转场和路由栈操作
      return HMInterceptorAction.DO_REJECT;
    }
  }
}

@HMInterceptor({priority:7,interceptorName:'LoginInterceptor2'})
export class LoginInterceptor2 implements IHMInterceptor {
  private isLogin2: boolean = true;

  handle(info: HMInterceptorInfo): HMInterceptorAction {
    if (this.isLogin2) {
      // 跳转下一个拦截器处理
      console.debug("测试拦截",'拦截器2','拦截住了');
      return HMInterceptorAction.DO_NEXT;
    } else {
      HMRouterMgr.push({
        pageUrl: 'Index4',
        param: { targetUrl: info.targetName },
        skipAllInterceptor: true
      })
      // 拦截结束,不再执行下一个拦截器,不再执行相关转场和路由栈操作
      return HMInterceptorAction.DO_REJECT;
    }
  }
}
动画
全局动画
- (1) 创建自定义动画 entry>src>main>ets>model(自己定义的文件夹)>(新建的 HMAnimator)
import { IHMAnimator } from "@hadss/hmrouter";

export const globalPageTransitionEffect: IHMAnimator.Effect =
  new IHMAnimator.Effect({
    direction: IHMAnimator.Direction.BOTTOM_TO_TOP,
    opacity: { opacity: 0.5 },
    scale: { x: 0.5, y: 0.2 },
});- (2) 挂载到全局
import { globalPageTransitionEffect } from "../model/HMAnimator";
HMNavigation({
  navigationId: "AppNavigation",
  options: {
    standardAnimator: globalPageTransitionEffect,
    dialogAnimator: HMDefaultGlobalAnimator.DIALOG_ANIMATOR,
    modifier: this.modifier,
  },
});特殊页面 自定义动画
开发者可以自定义动画类并实现 IHMAnimator 接口中的 effect 方法
该方法会将页面进出场的效果对象 enterHandle 与 exitHandle 作为参数传入
可通过参数对象上的 start、finish 方法,设置对应效果的起止状态,支持设置的常用属性还有:
curve:设置动画速度曲线,支持通过 Curve 枚举传入值,默认 Curve.EaseInOut。
duration:动画持续时长,单位 ms。
INFO
start/finish 方法参数说明如下:
translateOption:坐标位置,以屏幕左上角为原点,水平向右为 x 轴正方向,竖直向下为 y 轴正方向。百分比相对于屏幕宽度。例如希望从右侧进入可以设置 translateOption.x 从 100%变到 0。
scaleOption:页面缩放,可通过 scaleOption.x、scaleOption.y 单独设置横纵方向的缩放比例。
opacityOption:跳转页面的透明度
以下代码示例表示入场时由屏幕底部以线性速度向屏幕顶部运动,入场动画持续时长为 3000ms。
出场时从屏幕顶部以线性速度向屏幕底部运动,出场动画持续时长也为 3000ms。
流程
(1) 创建自定义动画 entry>src>main>ets>model(自己定义的文件夹)>(新建的 HMCustomAnimator)
import {
  HMAnimator,
  HMAnimatorHandle,
  IHMAnimator,
  OpacityOption,
  ScaleOption,
  TranslateOption,
} from "@hadss/hmrouter";

@HMAnimator({ animatorName: "CustomAnimator" })
export class CustomAnimator implements IHMAnimator {
  effect(enterHandle: HMAnimatorHandle, exitHandle: HMAnimatorHandle): void {
    // 入场动画
    enterHandle.start(
      (
        translateOption: TranslateOption,
        scaleOption: ScaleOption,
        opacityOption: OpacityOption
      ) => {
        translateOption.y = "100%";
        scaleOption.x = 0.7;
        opacityOption.opacity = 0.3;
      }
    );
    enterHandle.finish(
      (
        translateOption: TranslateOption,
        scaleOption: ScaleOption,
        opacityOption: OpacityOption
      ) => {
        translateOption.y = "0";
        scaleOption.x = 1;
        opacityOption.opacity = 1;
      }
    );
    enterHandle.duration = 3000;
    enterHandle.curve = Curve.Linear;

    // 出场动画
    exitHandle.start(
      (
        translateOption: TranslateOption,
        scaleOption: ScaleOption,
        opacityOption: OpacityOption
      ) => {
        translateOption.y = "0";
        scaleOption.x = 1;
        opacityOption.opacity = 1;
      }
    );
    exitHandle.finish(
      (
        translateOption: TranslateOption,
        scaleOption: ScaleOption,
        opacityOption: OpacityOption
      ) => {
        translateOption.y = "100%";
        scaleOption.x = 0.7;
        opacityOption.opacity = 0.3;
      }
    );
    exitHandle.duration = 3000;
    enterHandle.curve = Curve.Linear;
  }
}(2) 要跳转到的页面使用
import { CustomAnimator } from "../model/HMCustomAnimator";
Button("点击3")
  .type(ButtonType.Capsule)
  .onClick(() => {
    console.log("点击了我3");
    HMRouterMgr.push({
      navigationId: "AppNavigation",
      pageUrl: "Index4",
      animator: new CustomAnimator(),
    });
});依据条件来执行不同的动画
- 比如说横屏一个动画 效果 竖屏一个动画效果
简单来说就是通过判断,横屏一个自定义动画,竖屏就走另外一个动画
@Component
export struct CommentInput {
  // ...
  build() {
    Row() {
      // ...
      Image($r('app.media.icon_comments'))
        .width(24)
        .height(24)
        .margin({ right: 16 })
        .onClick(() => {
          if (this.isLandscape) {
            HMRouterMgr.push({
              navigationId: this.queryNavigationInfo()?.navigationId,
              pageUrl: 'liveComments',
              param: {
                commentRenderNode: this.commentRenderNode,
              },
              animator: myAnimator2
            }, {
              onResult: (paramInfo: PopInfo) => {
                this.videoWidth = '100%';
              }
            })
            this.videoWidth = '50%';
          } else {
            HMRouterMgr.push({
              navigationId: this.queryNavigationInfo()?.navigationId,
              pageUrl: 'liveComments',
              param: {
                commentRenderNode: this.commentRenderNode,
              },
              animator: myAnimator1
            }, {
              onResult: (paramInfo: PopInfo) => {
                this.videoHeight = '100%'
              }
            })
            this.videoHeight = '30%'
          }
        })//
        })// ...
    }
    // ...
  }
}